flat-rate-shipping

Flat Rate Shipping $11.99

hand-craftes-in-australia

Hand Crafted in australia

afterpay-zip-paypal-credit-card

AFTERPAY . PAYPAL . CREDIT CARD

Search
Close this search box.
Search
Close this search box.

Guide to Necklace Legth

Standard Necklace Lengths For Women

The above chart of standard necklace lenghts allow to to better understand the exact look that you are going for. These are the six most common lenghts, the most common are choker and princess lengths, especially for fine chains.

The Following Chart shows standard necklace lengths for the average women


Here’s how to accurately measure the necklace length for yourself:

  1. Select a Similar Necklace: Choose a necklace or cord similar to the one you’re purchasing. Ensure that the thickness of the chain matches the one you intend to buy. If you don’t have a similar necklace, you can use a string or cord of the same thickness.
  2. Wrap Around Your Neck: Enlist someone’s help to wrap the string or chain around your neck, pressing one end against the nape. Adjust the other end until it falls the way you desire your necklace to sit, and mark where it meets the first end on the back of your neck.
  3. Measure the Length: Lay the string or chain flat on a surface and measure the length up to the marked point. This measurement indicates your desired necklace chain length.

When selecting the right necklace length for someone else, consider the following tips:

  1. Measure an Existing Necklace: If possible, measure one of their existing necklaces that falls the way they like it. This provides the most accurate sizing information.
  2. Educated Guess: If measuring isn’t an option, make an educated guess based on their style preferences and neck size.
  3. Consider Common Lengths: For women, the “princess length” (16″ for petite, 18″ for average, 20″ for curvier, and 22-24″ for taller frames) is a safe choice. For men, aim for 18-20″ for smaller frames, 20-22″ for average, 22-24″ for larger builds, and 24″ and above for tall, well-built individuals.
  4. Flexibility: Opting for lengths slightly shorter or longer than average ensures the necklace remains wearable even if the sizing isn’t precise.

By following these guidelines, you can confidently select a necklace length that suits their style and physique.

Choosing a necklace length that complements your facial shape can enhance your overall appearance. Here are some general guidelines:

  1. Round Face:
    • Opt for necklace lengths that elongate your silhouette, such as opera length or matinee length. These longer lengths help create the illusion of a slimmer face.
  2. Oval Face:
    • Oval faces are versatile and can wear various necklace lengths. However, shorter necklaces like chokers or collar length can accentuate your natural shape.
  3. Square Face:
    • Soften angular features with necklace lengths that add curves. Princess length and opera length necklaces work well by drawing attention away from sharp lines.
  4. Heart-Shaped Face:
    • Balance a heart-shaped face with shorter necklace lengths like chokers or collar length. These lengths accentuate the jawline and complement the natural shape of the face.
  5. Long Face:
    • Balance out the length of a longer face with shorter necklace lengths such as chokers or collar length. These lengths help create the illusion of a shorter face.

When in doubt, the classic princess length (18 inches) is a safe and timeless choice that complements most facial shapes. Experimenting with different lengths can help you find the perfect necklace that accentuates your features and completes your look.

For those with a petite frame, longer-style necklaces can sometimes overwhelm the delicate proportions. Opting for shorter necklace lengths like chokers or princess length (16-18 inches) can be more flattering as they complement a smaller frame without overpowering it. These lengths help maintain balance and proportion, ensuring that the necklace enhances rather than distracts from your overall look.

How to take a fingerprint

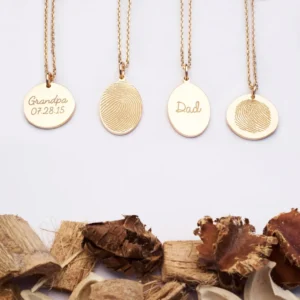
Fingerprint Jewellery is one of the most unique and meaningful personalised jewellery around. Many people love fingerprint items as memorial  jewellery to remember a loved one. However, customers often come to us with questions about where they can obtain fingerprints of someone who has passed away, or how they can take good, usable fingerprints of the living. This comprehensive guide will walk you step-by step to obtain the most accurate fingerprints for your piece of keepsake.

You might not know it, but it’s likely that you already own or have access to the fingerprints you need. This is especially significant for people who would love a fingerprint memorial jewellery piece of someone who has passed away.

– For people who have passed away: Most funeral homes take fingerprints of those who have passed away. Check with them – they are often more than willing to help you create a memento of someone you love.
– For military men who were killed or missing in action: All soldiers have their fingerprints taken in military service – do check their paperwork or ask the military office where they are registered with.
– For babies: Many hospitals take baby’s footprints or handprints as means of identification. Some even send you home with a print-out of it. Check with the hospital if they keep a record of it.

Memorial Jewellery

For those who could take fresh prints, the guide below will help you to take your own fingerprint or your baby’s handprint or footprint.

HOW TO TAKE FINGERPRINT AT HOME

When jewellery is made from a fingerprint, we can only make it as good as the fingerprint sample you give us, so you will want to capture a nice clear print.

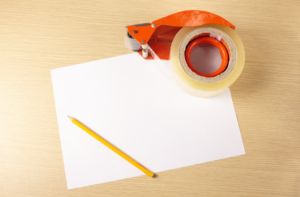
Taking fingerprints at home is easy – all you need is a soft pencil, transparent tape* and white paper. Follow the step-by-step instructions below:

Step 1: Make sure that your fingers are clean and dry

Memorial fingerprint jewellery

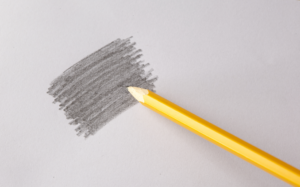
Step 2: With a soft pencil, fill in a large patch on the white paper. Layer on the patch with the pencil again and again to get a fair bit of graphite on the paper.

Memorial fingerprint jewellery

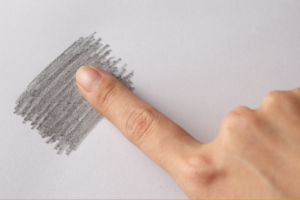
Step 3: Place your finger over the dark batch to get graphite on your finger.

Memorial fingerprint jewellery

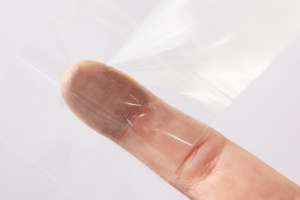
Step 4: Gently the sticky side of the clear tape on that finger and also gently peel the tape off

Memorial fingerprint jewellery

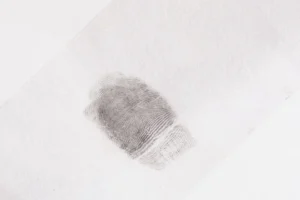
Step 5: Stick the tape onto a white piece of paper. Take a photo of the fingerprint (tips for taking a good photo below!)

Memorial fingerprint jewellery

Step 6: Repeat the steps with that finger or others until you get a good, clear photo. It is always safer to take a couple and let the jeweller choose which one to choose from.**

Memorial fingerprint jewellery

Memorial fingerprint jewellery

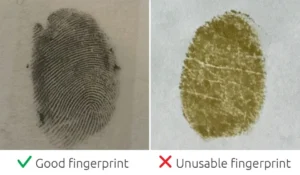
*If you do not have clear tape, you can always just press your finger on the white paper and take photo of that. However, take note that you should tap lightly, and try hard not to shift your finger. If you shift your finger when it’s pressed down, it will caused your fingerprint to be smudged and unusable. A good fingerprint will have clear, defined lines and no blurry patch.

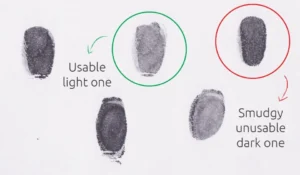
Try making lighter fingerprints by taking several prints without refreshing the graphite on your finger. The first few darker ones will often have smudges from the excess graphite.

**Take as many fingerprints as you can using different fingers as they will have different patterns. Some patterns may be more suitable for thumbprint jewellery, or look better on a necklace vs a bracelet vs a ring.

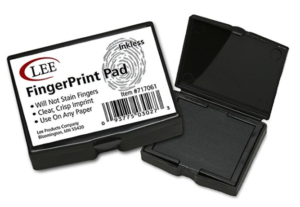
If you want the most accuracy in taking your thumbprint, or have a lot of fingerprints to take (from many family members or young ones for a thumbprint gift, for example) you might want to consider getting an inkless fingerprint pad.

Memorial fingerprint jewellery

Fingerprint inkless pad is about the best way to take fingerprints, giving out perfectly clear fingerprints. It does not leave smudges, the ink dries instantly on paper and washes right off from your fingers. Inkless thumbprint pad is widely used in banks and offices where accuracy is needed.

You can buy the lee inkless fingerprint pad here:

HOW TO TAKE PICTURES OF FINGERPRINTS

After you’ve mastered the print taking, the next step will be to take pictures of the fingerprints and send them to us. Here are a few tips:

1. Take your picture in good light. Place the prints next to a window or a bright lamp helps to reduce shadowing across the prints.
2. Take a bird’s eye view of the prints, making sure that your camera is parallel to the print.
3. Make sure the print is in focus so the jewellers can get as much details as possible out of the print.
4. Take a couple if needed and send the fingerprint photos to the us via email.